|
Chapter 01-4: Edge Detection with multiple straight lines selections |
Chapter
01-4 descripes a way to detect a edge with multiple lines. This is a
more accurate method to detect the corner of a given object. The method
is to spread a certain amount of searchlines along the edge of an
object and to compute several cornerpoints. Once you have detected a
certain amount of edge points you will make a best fit of a straight
line inbetween the given points. In this chapter you will use the
roiManager to store the lines. At this point you should know the basic
handling with the roiManager in imagej. RoiManager OnlineHelp
This method is limited also to horizontal straight line selections.
|
Step 01: The start-up image |

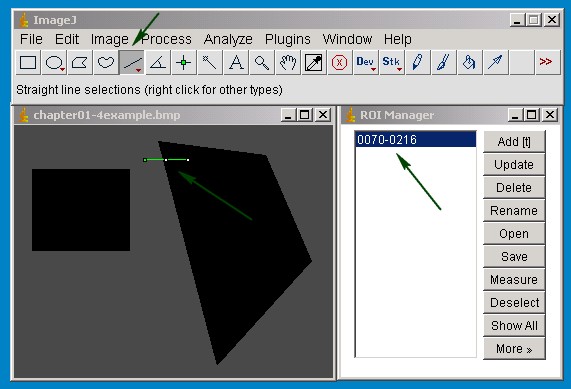
The first step is to open an image and
select the straight line tool. Draw a horizontal line (press the
shift key while dragging the mouse). It is necessary to start from the
left side drawing to the right side with the search direction from the
bright side to the dark side, otherwise the macro will not work
correctly. After the line is created press the t-key on your keypad and
the roiManager window pops up. Now the straight line roi is
stored in the roiManager and can be used later on.
|
Step 02: Adding additional search lines to the roiManager |

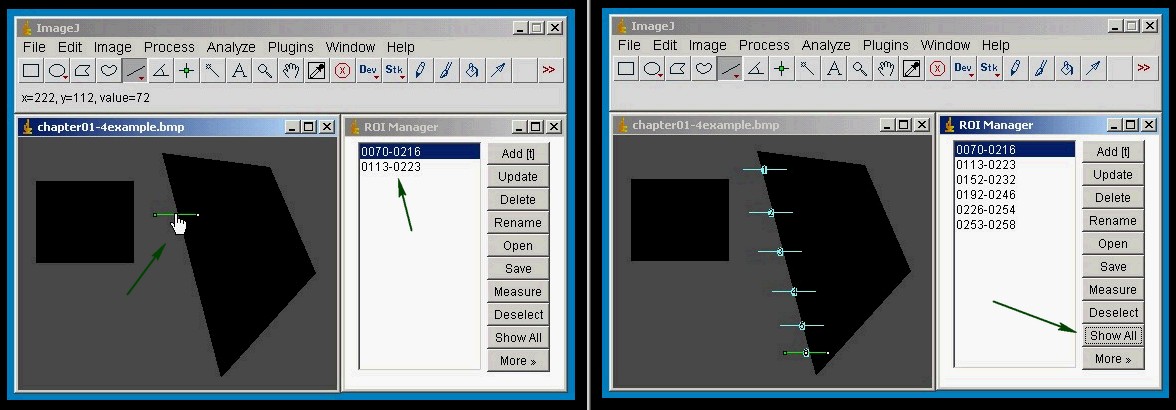
Adding additional lines to the
manager. Basically you could draw every line new and add it to the
roiManager like in step 01. But a faster way is to grab the line, move
it to the next spot and press the t-key. The only thing you have to
look for is not to get mixed up with the number of the line and the
position in the row. The first line has to be the first line in the
row, the second has to be the second and so on...If you mix up the
position of the line the fitting of the detected edge line will not
work correctly. You can add as many lines as you wish. The only limit
is the array buffer in imagej. To detect a corner very precisely
usually you don' t need more than 10-20 search lines. There are a lot
of things you can do with the rois in the roiManager. It is worth
to have a look in the official imagej dokumentation. Now everything is
set to run the macro.
|
Step 03: Compute the corner points and fit a straight line |
Some simple code sample for the imagej macro language. Just copy the code into a new imagej text window and run the macro.
/***********************************************************************************************************************/
/*
This macro detects the corner of a bright to dark edge and draws a
straight line selection at the */
/* detected edge.
*/
/***********************************************************************************************************************/
/*
Step 01: check for minimum 2 straight line selections in the
roiManager
*/
count = roiManager("count")
if (count<2) exit("Error: minimum 2 straight line selections are required");
for(i=0; i<count; i++)
{
roiManager("select", i);
getSelectionCoordinates(x,y);
//print(selectionType()," ",y[0],y[1], count);
if((y[0]!=y[1])&&(x[0]!=x[1])) exit("Error: horizontal or
vertical straight line selections required");
if(selectionType()!=5) exit("Error: horizontal straight line selections required");
}
/***********************************************************************************************************************/
/*
Step 02:
Declarations
*/
function cornerdetect(Pixel_I);
x1 = 0;
y1 = 0;
number_lines
=
roiManager("count");
// saves the number of the straight line selections in the roiManager
array_cornerpointsX
= newArray(number_lines); //
variable for the x-values of the detected cornerpoints
array_cornerpointsY
= newArray(number_lines); //
varialble for the y-values of the detected cornerpoints
bild = getImageID();
/***********************************************************************************************************************/
/**************************************** M A I N **********************************************************************/
/***********************************************************************************************************************/
for(i=0; i<number_lines;i++)
{
selectImage(bild);
roiManager("select",i);
getLine(x1,y1,x2,y2, width);
profile_line = getProfile();
// horizontal selections
if (y1 == y2) {
corner_Pt_x = cornerdetect(profile_line);
corner_Pt_x += x1;
array_cornerpointsX[i] = corner_Pt_x;
array_cornerpointsY[i] = y1;
print( "roiManager Line Number",i);
print( "x-Coordinate edgepoint: ", corner_Pt_x);
print( "y-Coordinate edgepoint: ", y1);
}
// vertical selections
if (x1 == x2) {
corner_Pt_y = cornerdetect(profile_line);
corner_Pt_y += y1;
array_cornerpointsX[i] = x1;
array_cornerpointsY[i] = corner_Pt_y;
print("roiManager Line Number: ", i);
print( "x-Coordinate edgepoint: ", x1);
print( "y-Coordinate edgepoint: ", corner_Pt_y);
}
}
doLineFit("Straight Line", array_cornerpointsX, array_cornerpointsY, number_lines); // function for the line fitting
/***********************************************************************************************************************/
/************************************** S U B R O U T I N E S ******************************************************/
/***********************************************************************************************************************/
/***************************** 01 Subfunction: Detect Cornerpoint ************************************************/
function
cornerdetect(Pixels_I)
// argument is the values of the profile_line array
{
maxvalue = 0;
pos_maxvalue = 0;
array_getcornerpoint = newArray(Pixels_I.length);
for(i=0; i<Pixels_I.length-1; i++)
{
array_getcornerpoint[i] = Pixels_I[i] - Pixels_I[i+1];
if(array_getcornerpoint[i]>maxvalue)
{
maxvalue = array_getcornerpoint[i];
pos_maxvalue = i;
}
}
print("Value of maxvalue = ",maxvalue);
return pos_maxvalue;
}
/***********************************************************************************************************************/
/******************************** 02 Subfunction: Do Line Fit ******************************************************/
function doLineFit(equation, array_ptx, array_pty, nLines)
{
Fit.doFit(equation, array_ptx, array_pty);
ArrayNr = nLines -1;
Fit.logResults
y_Wert1 = Fit.f(array_ptx[0]);
y_Wert2 = Fit.f(array_ptx[ArrayNr]);
print("y_Wert2: ",y_Wert2);
print("x_Wert2: ", array_ptx[ArrayNr]);
print("y_Wert1: ", y_Wert1);
makeLine(array_ptx[0], y_Wert1, array_ptx[ArrayNr], y_Wert2);
updateDisplay();
}
/***********************************************************************************************************************/
/***********************************************************************************************************************/
/********************************************* E N D M A C R O ***************************************************/
/***********************************************************************************************************************/
|
Step 04: Enjoy the results |

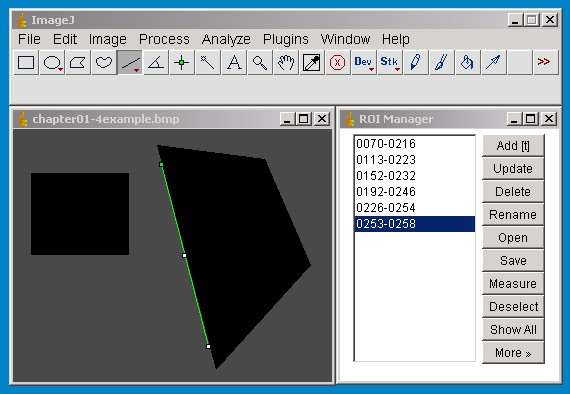
So
this is the result line. You have to play around to get an idea what
sort of edges can be detected. This is a very simple routine which
could be enhanced whith filter techniques or better search algorithms.
If you want to detect dark to bright edges as well, you just have
to invert the image, process the cornerdetect funktion and invert
the image again. Later on I'm gonna spend time to on this subject as
well. But for now I'll try to keep the programms short, clear and
comprehendible.


