This
Chapter shows
step by step how to set up the Netbeans IDE to develop image processing
applications using the ImageJ library. Developing with an IDE can be
very useful for the rapid development of costumized and versatile user
interfaces. Beyond that you can import additional software librarys to
develop powerful and unimaginable applications.
This chapter explains very detailed the necessary steps to get a simple
app running. From there you can explore the whole image processing
world a lot easier by yourself and play around with hundreds of ImageJ
processing functions.
4 steps for the easy and quick setup:
1. Get the necessary
files
2. Create a simple graphical user interface
3. Import the necessary ImageJ jar file
4. Write code to open, invert and display an image
1. Get the necessary files:
Download the current version of the Netbeans-IDE from the official webside: http//netbeans.org.
To develop imagej applications the "Java SE" edition is sufficient. If
you are planning to dig deeper you can download and install the "c/cpp"
bundle as well. I'm using currently the 6.9 edition on a linux mint
operating system and also the same version on a Windows XP Professional system. Follow the installation instructions
according to your operating system. That means you basically get the
exe-file for a Windows pc or you install the IDE through the package
manager in case of a linux system. Neither shouldn't be a problem to
install.
Once you are finished with that and you haven't ImageJ already running
on your system, than you should download it by now from the official imagej webside and follow the installation instructions.
You don't have to install necessarily ImageJ as an application, but
quite often it is very convenient to quickly try funktions and
operation on images ahead and analyse the results before implementing
the functions into your image processing applications.
Make sure you also have the Java SDK and the Java runtime enviroment on your system. Both you can get as a bundle on the oracle webside.
2. Create a graphical user interface:
So once you have ImageJ, Netbeans and Java SDK
installed we are set to start the first example application. The first
project will be a simple application with a graphical user interface
(GUI). We gonna add two buttons, the first one will open an image from
a file and the second button will invert the image.
The first thing is to start Netbeans and and create a new project:
<File><New Project>. So now you should see something like
that:
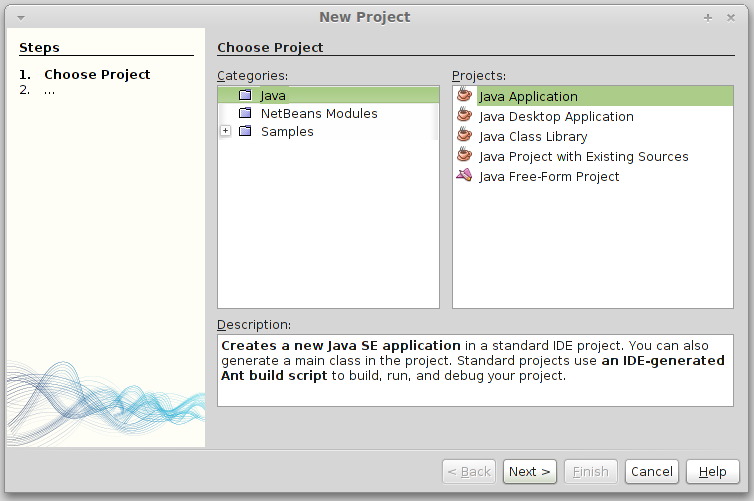
As project we choose a "Java Application" and click next. On the next dialog you can give the project a fancy name.
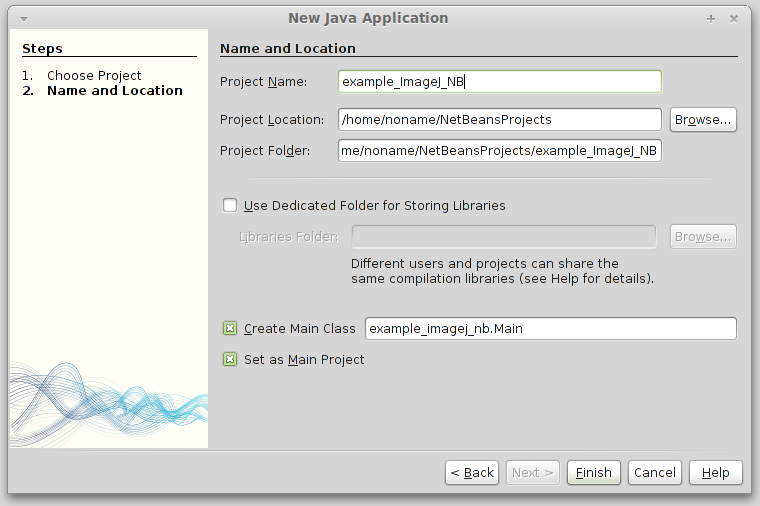
Make sure the option "Create Main Class" and "Set as Main Project" is
turned on. Especially if you are not so familiar with the Netbeans
developing enviroment. Hit the "Finish" button and Netbeans will setup
the structure for your porject. Now you could hit the "F6" key to build
and run the appliction. If you installed Java SDK and Netbeans
succesfully there shouldn't be any error messages.
If everything went allright we can now add the user interface window:
<File><New File><AWT GUI Forms><Frame Form>.
After hitting the next button you can name the new frame class. For my
self I choosed to name it "user_interface". To show the window at the
start of the application we add following code to the Main.java class.
Go to the line where it says "//TODO code application logic here" and
add the following 3 lines of code:
user_interface ui = new user_interface(); // instantiate a new user interface
ui.setSize(800, 600); // set the size of the window
ui.setTitle("User Interface - Image Processing with ImageJ"); // name the window
ui.setVisible(true); // show the window on the desktop
Now you can hit the "F6" key
again and test the application. When everything went ok and you didn't
make any writing mistakes, a boring empty window should pop up.
3. Import the ImageJ jar file:
So now we are at
the point were we want to do something with images. To work with the
ImageJ functions in the Netbeans IDE we need to import the "ij.jar"
file. This jar file includes all the classes necessary for the image
processig. In case you installed ImageJ in the regular directory,
than you can find this file in the home/username/.imagej directory
(linux), or in the directory C:\Program Files\ImageJ\ (Windows). To
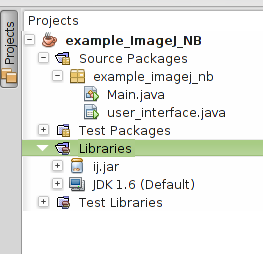
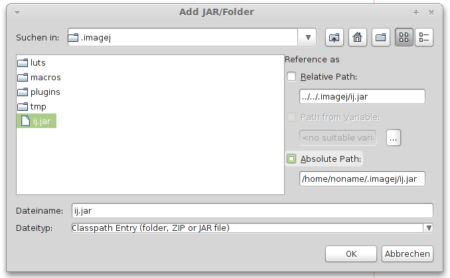
install the "ij.jar" file make a right click where it says Libraries in
the Projects-Window, select the entry "Add JAR/Folder..." in the
context menue. Then a dialog pops up where you can navigate to the
imagej folder and select the ij.jar file.
Now go back to the user_interface class and add following line on the top:
import ij.io.Opener; // imports the ij.io.Opener class (includes functions to open images)
Press the F6 key. There shouldn't any error messages. So now you can
add two java.awt.Buttons and a java.awt.Label. The label we use as a
convenient way to display an image. There may be better ways to work
with images in java, but the label is very simple to use. I named
the first button btn_open_image, the second button is btn_invert_image
and the label simply display. If you run the application now, you
should see the frame with two simple buttons on it.
So now we have to add some additional imports instructions. Add the following line to your user_interface class:
import ij.Ij; // this class contains a usefull method to open an image from file
import ij.ImagePlus; // the class to hold the image + the processor + metadata + etc...
import ij.process.ImageProcessor; // the ImageProcessor contains the pixel data and useful methods to manipulate the pixels
import java.awt.*; // contains the java.awt.Image
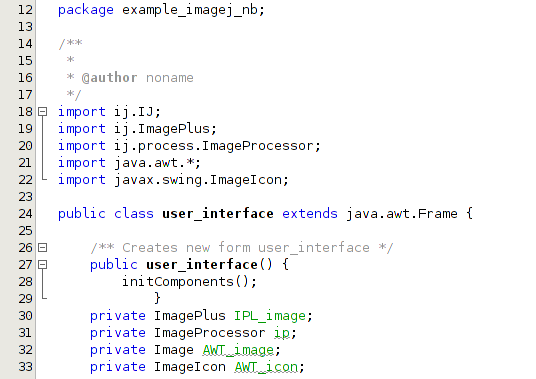
Now we got all the necessary imports for the basic operations like
loading, displaying and inverting an image. Let's declare some
necessary variables. Add the following lines to your user_interface
class just right after were it says "public user_interface(){...}". Add these 4 variables:
private ImagePlus IPL_image; // the imagej image variable
private ImageProcessor ip; // the ImageProcessor variable to manipulate the pixels
private Image AWT_image; // the java another window toolkit variable
private ImageIcon AWT_icon; // the java AWT icon
To get a better overview, a quick snapshot about what it should look like at this stage:
4. Code to open, invert and display an image:
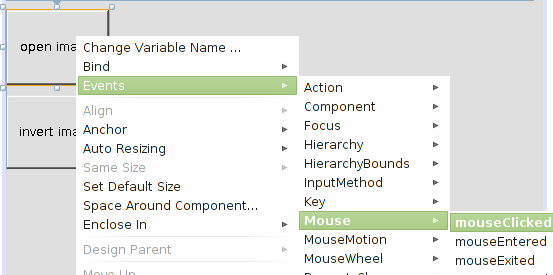
Add the function for the mouse clicked event.
Make a click with the right mouse button on your open „image button“
and follow the context menue until the mouseClicked event. Netbeans
will automatically add the necessary line of code to your class.
Finally we are ready to add the first image processing code to our
project. Write the following lines of code to your
btn_open_imageMouseClicked function:
IPL_image = IJ.openImage("/home/noname/Bilder/example blobs/blobs01.bmp");
IPL_image.show();
Hit the F6 key and o wonder it really displays an image in a seperate
window, but only if the path is a real image destination on your
machine. This is a nice and quick setup for the first image operations
but soon you will get bored by opening hundreds of times the same
image. Let's step a little bit deeper.
A very important class in the ij.jar file is the ImageProcessor class.
Like I mentioned already this class will give you the access to
each pixel in the image and manipulate it's value, which is essential
to write image processing code.
To transfer the pixels from the image you just opened to the
ImageProcessor object (in this case we named it „ip“) it needs just one
line of code:
ip = IPL_image.getProcessor(); //get access to the pixels
The „getProcessor()“ method gives you access to the image pixels. So
now we want to display the image in the label we added to our user
interface. The function to convert a ImageJ-image to a java awt-image
is the ImageProcessor method createImage(). Finally we just have to
convert the java awt-image into a java awt-icon. Add this three
additional lines to your btn_open_MouseClicked function:
AWT_image = ip.createImage(); // create the java awt-image
AWT_icon = new ImageIcon(AWT_image); // create the icon from the AWT_image
slbl_display.setIcon(AWT_icon); // display the image as a icon in the swing label
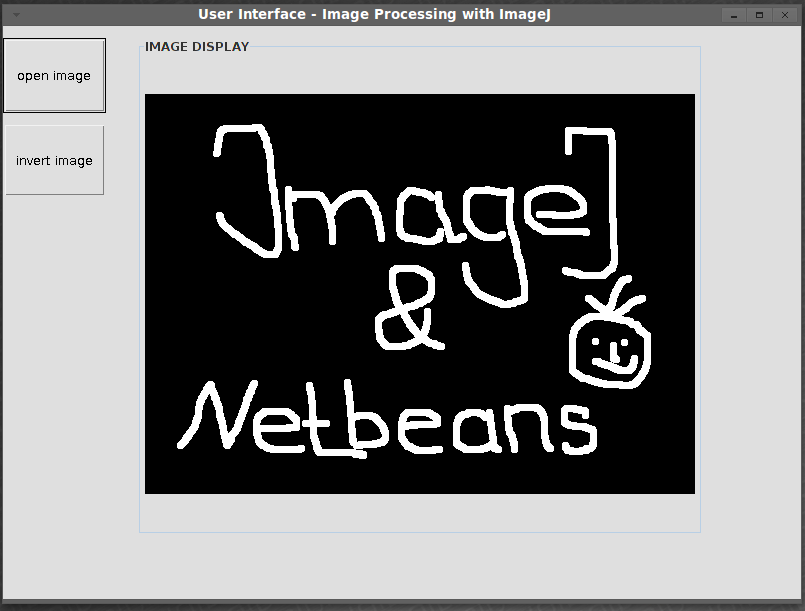
These 4 lines of code is all you need to load, convert and display the
image. You are ready to hit the F6-key again and check the result. Now
you should see something similar like that:
So now comes the last step. Pressing the „invert image“ button the
displayed image should be inverted. So add the following code to the
"btn_invertMousePressed" function:
ip.invert(); // function to invert the image
AWT_image = ip.createImage(); // create a java.awt.Image out of the ImageProcessor pixels
AWT_icon = new ImageIcon(AWT_image); // convert the java.awt.Image to a javax.swing.ImageIcon
slbl_display.setIcon(AWT_icon); // display the javax.swing.ImageIcon
Run the application again. So the first thing you should do is to open
the image. After that you should invert the picture. If you do it the
other way around you will get an „NullPointerException“ error message.
Because the ImageProcessor ip is not initialized. At this state we
ignore the error handling just to keep the code easy to read and
concentrate on the image processing.
The complete example project can be downloaded here „link einfügen“.